Ground Segment & Operations (GSO)
The GSO domain in a CDF study will mostly use COMET to view other domain’s values and ground stations, etc. The following steps use the example of a Ground Station to be modelled in the Tutorial COMET model:
-
Connect to Citrix and open the COMET Application. To do so, follow the steps outlined here.
-
Connect to the CDF COMET server and open the model
Tutorial COMET. To do so, follow the steps outlined here. -
Also open the model
GSO catalogue. To do so, follow the steps outlined here. -
Open the Element Definition browser for both the Study Model and the Catalogue Model. You can do that by following the steps outlined here.
-
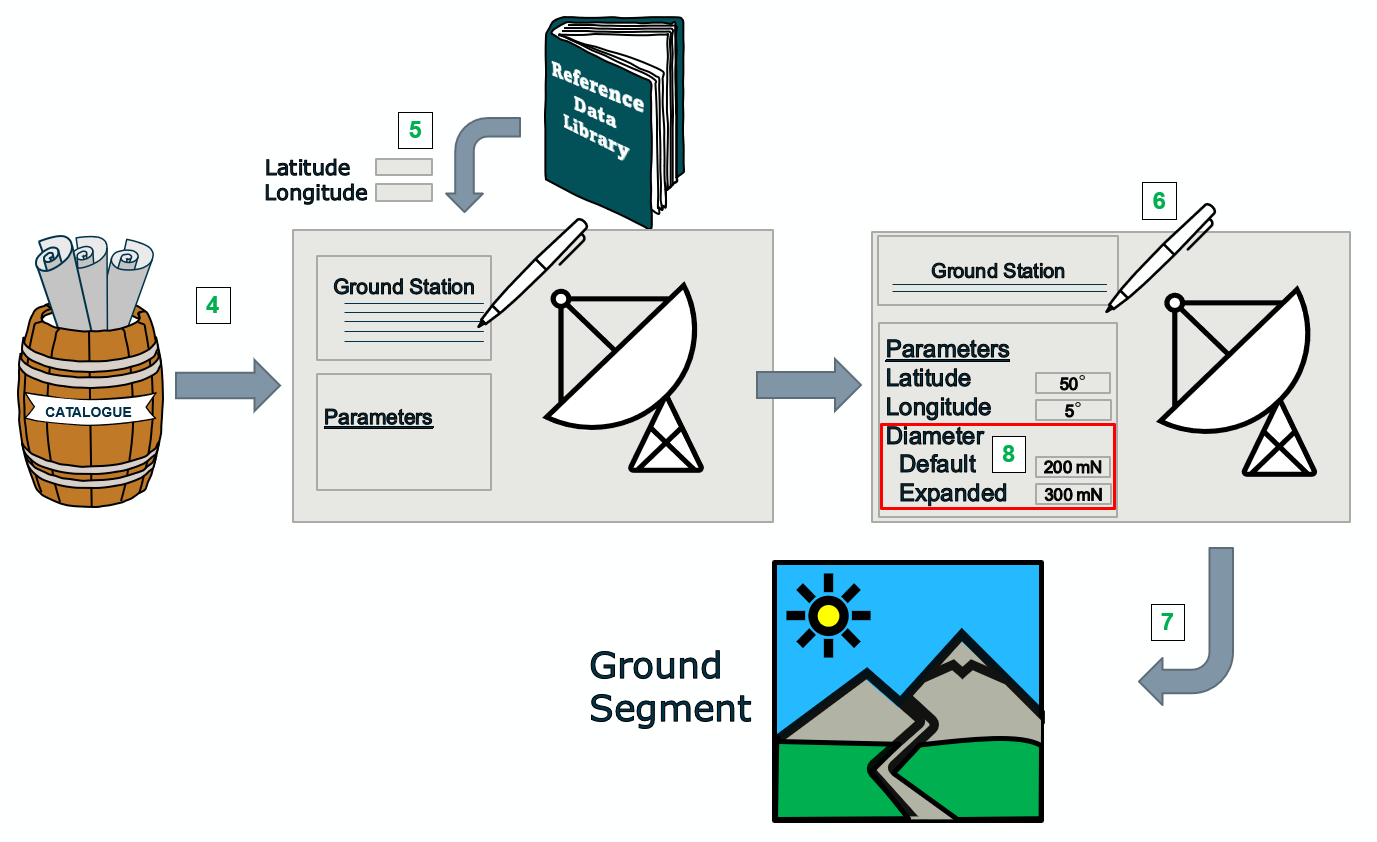
Use the
Generic Equipmentfrom the catalogue to define theGround StationElement Definition in theTutorial COMETmodel. To do so, follow the steps outlined here.NOTE: Normally, the Catalogue Model should first be searched to see if there already is an Element Definition describing the equipment in question. In this case, it is assumed this was done and no matching
Ground Stationequipment was found. Therefore, this tutorial makes use of theGeneric Equipment -
Use the Reference Data Library to add the two additional parameters
latitudeandlongitudeto the Element Definition. To do so, follow the steps outlined here. -
Populate the
Manualfields of the Parameter Values for the newly createdlatitudeandlongitudeparameters. To do so, follow the steps outlined here. -
Create 1 Element Usage of the
Ground Stationin theGround SegmentElement Definition. To do so, follow the steps outlined here. -
The tutorial model contains 2 Options: the “Default” Option describing the baseline spacecraft design and the “Expanded” Option describing a larger version of the spacecraft with a larger payload. This requires some changes in the GSO design:
- The
Ground Stationin the “Expanded Option” should have a differentlatitudeandlongitudeand therefore these parameters need to be Option dependent. To do so, follow the steps outlined here. - Introduce different values for the
latitudeandlongitudeparameters in the two Options. - The “Expanded Option” will also require a 2nd
Ground Stationinside theGround Segmentwhich is not necessary in the “Default” Option. To do so, follow the steps outlined here.
- The
In the above steps the COMET Application was used to directly interact with the Study Model. However, one of the key advantages of storing data on the COMET server is that it also offers the possibility to interact with the Study Model using standard Excel workbooks and using the COMET server as an interface between the workbooks of the different domains. In the following steps, an overview on how this link between the Study Model and Excel can be achieved with the Excel COMET Plugin is provided. A specific Excel workbook for the GSO domain has been set-up by the GSO experts from previous CDF studies and should be available in the Study Folder of the CDF Working drive (accessible from Citrix). In this tutorial, for the sake of simplicity, a blank Excel workbook will be used to demonstrate the basic functionality:
-
Use the COMET Application to subscribe to the parameter
wet massof theSpacecraftElement Definition. To do so, follow the steps outlined here. This parameter will be needed for the Excel computations. -
Connect to Citrix and open an instance of Excel with the COMET Excel Plugin. To do so, follow the steps outlined here.
-
In Excel use the COMET Excel Plugin to connect to the CDF COMET server and open the model
Tutorial COMET. To do so, follow the steps outlined here. -
Execute a
Rebuildand find thewet massparameterActual Valuecell in the Parameters sheet. To do so, follow the steps outlined here. -
On a new sheet in the Excel workbook perform a simplified calculation to compute values for the
latitudeandlongitudeparameters of theGround Stationmaking use of the cell name referring to the Subscription of thewet massparameter. To do so, follow the steps outlined here. -
Attribute cell names to the result field including the calculated
latitudeandlongitudeparameters. To do so, follow the steps outlined here). -
In the Parameters sheet insert the cell name as a formula in the
Computedfield of thelatitudeandlongitudeparameters and set theSwitchaccordingly. To do so, follow the steps outlined here. -
Use
Submitto “push” the computed value to the Study Model. To do so, follow the steps outlined here. -
Switch back to the COMET Application and verify the new values is introduced in the
latitudeandlongitudeparameters and marked as ready for publication (highlighted in blue).
