STEP TAS adapter - User manual
Table of Contents
- General
- Set-up and Initialization
- Getting Started
- Mode Selection and Control
- Normal Operations
- Normal Termination
- Error Conditions
- Recover Runs
TODO : Work in progress
The document outlines the software user manual of the ISO10303-242 (STEP 3D CAD) DST Adapter.
Before continuing further, please be aware of the limits of the adapter and of the troubleshooting page in the event an error should happen during the process.
General
To start the adapter, just run the executable from the unzipped folder.
Set-up and Initialization
No specific task needed to be done at this point.
Getting Started
To install the application, unzip the STEP-TAS_DST_Adapter_1.0.1.zip content into a directory. That directory will be referenced as INSTDIR in future sections of this document. To start the application, launch the INSTDIR\DEHPSTEPTAS.exe file. Note: This application uses libraries created with Visual Studio C++ 2019 and it could happen that these runtime libraries are not installed on some Windows systems. Then, we recommend also to execute the INSTDIR\redist\vcredist_x64.exe in order to install these runtime libraries. During start-up process, the application will create in INSTDIR (if they do not exist yet) the following directories which contain the information relative to the user preferences:
- UserPreferenceService: contains the saved connection with ECSS-E-TM-10-25 data sources and general user preferences.
- TempHubFiles: cache of STEP-TAS files downloaded from the Hub.
The application starts maximized showing the main window as follow:
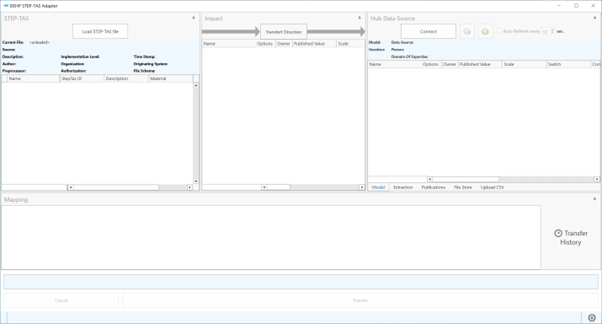 Figure 1:The main window of STEP-TAS adapter
Mode Selection and Control
From the main window of the adapter, it is possible to:
- To load a local STEP-TAS files,
- To Connect/Disconnect from data sources
- To refresh the E-TM-10-25 session,
- To view messages on the status bar,
- To visualize trees from both models,
- To preview the net change
To operate with an ECSS-E-TM-10-25 data source, you must have the credential (user name and password) provided by its model administrator, and the access to at least one Domain of Expertise in the model. The account management is not a feature provided by the STEP-TAS adapter. For this, you can rely on COME-CE application provided by RHEA. The mapping direction is only From STEP-TAS to Hub. While reverse mapping is not possible in this adapter, because modifying an existing STEP-TAS file is not an obvious task (and often useless because few stored information is really readable/used by ESATAN), it is always possible to:
- Download the full STEP-TAS file used in previous transfer operations.
- Generate additional input files for local ESATAN-TMS computation from information stored on the HUB
- Upload temperature results (from local CSV files generated by ESATAN computation) to the hub
To start the exchange of information, you start by Connect to Hub and Load STEP-TAS File. To transfer information from STEP-TAS file to Hub the actions are:
- Select STEP-TAS part
- Configure Mapping for all desired parts
- Transfer mappings to Hub
To transfer back STEP-TAS files from the Hub:
- Select the STEP file from File Store and click on Download As button.
OR
- Retrieve directly the STEP-TAS file used for the mapping of an Element on the Hub contained in the “source” component of the step tas reference parameter.
Normal Operations
The STEP-TAS can perform the mapping of individual STEP-TAS parts in only one direction: From local STEP-TAS file to Hub. The STEP-TAS also enables:
- the transfer back of a STEP-TAS file from Hub to local file directly from the File Store panel
- the extraction/generation of additional input files for local ESATAN-TMS computation from information stored on the hub
- Upload temperature results (from local CSV files generated by ESATAN computation) to the hub
without being necessary to change the “Transfer direction” (unlike others adapters).
Normal Termination
Close the application by clicking on the “Close” button on the main window (the X cross button on the upper right part of the main window of the application). Current connection with the Hub will be closed. Important: The termination of the application will not automatically transfer pending mappings. This is the user’s responsibility to know when the mappings are correct and complete, and to decide to transfer them on the Hub.
Error Conditions
Any un-expected runtime error will be displayed as an exception message. In case of a fatal error, the execution will be aborted. As usual, the exit code of the application has a value of 0 (zero) for Normal Termination or any different value in case of error.
Recover Runs
The restart of the application will keep saved used preferences (e.g. recent STEP-TAS files, saved server addresses). No other data will be recovered (for example, the pending mappings which has not been transferred to the Hub will be lost). If the E-TM-10-25 server is not responding, you will notice it when attempting transfer in this direction or if you try to refresh the session. You might want to reconnect to the COMET server the way you connect the first time. If there is any pending transfer to E-TM-10-25, you can attempt them, but you will most likely have to cancel the transfer if any errors are raised.